Print quality troubleshooting
Try the solutions in this section to resolve print quality problems in your printout.
•
Solution 1: Make sure you are using original HP ink cartridges
•
Solution 2: Check the ink levels
•
Solution 3: Check the paper loaded in the input tray
•
Solution 4: Check the paper type
•
Solution 5: Check the print settings
•
Solution 6: Print and evaluate a print quality report
•
Solution 7: Contact HP support
Solution 1: Make sure you are using original HP ink cartridges
Solution: Check to see if your ink cartridges are original HP ink cartridges.
HP recommends that you use original HP ink cartridges. Original HP ink
cartridges are designed and tested with HP printers to help you easily produce
great results, time after time.
NOTE: HP cannot guarantee the quality or reliability of non-HP supplies.
Printer service or repairs required as a result of using a non-HP supply are
not covered under warranty.
If you believe you purchased original HP ink cartridges, go to:
www.hp.com/go/anticounterfeit
Cause: Non-HP ink cartridges were being used.
If this did not solve the issue, try the next solution.
Solution 2: Check the ink levels
Solution: Check the estimated ink levels in the ink cartridges.
Print quality troubleshooting
85
NOTE: Ink level alerts and indicators provide estimates for planning
purposes only. When you receive a low-ink alert, consider having a
replacement cartridge available to avoid possible printing delays. You do not
need to replace the ink cartridges until prompted to do so.
CAUTION: While ink cartridges are not damaged when left outside of the
printer, the printhead does need to have all cartridges installed at all times
after the printer is set up and in use. Leaving one or more cartridge slots
empty for an extended period may lead to print quality problems and possibly
damage the printhead. If you have recently left a cartridge out of the printer
for an extended period, or if you have had a recent paper jam, and have
noticed poor print quality, clean the printhead. For more information, see
Clean the printhead.
For more information, see:
Check the estimated ink levels
Cause: The ink cartridges might have insufficient ink.
If this did not solve the issue, try the next solution.
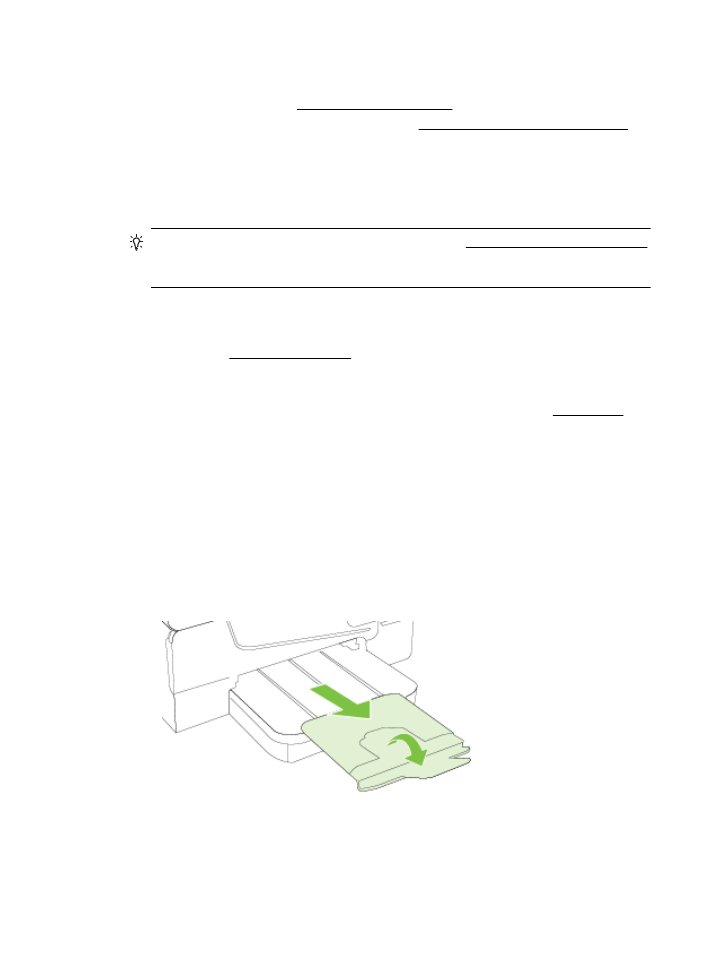
Solution 3: Check the paper loaded in the input tray
Solution: Make sure the paper is loaded correctly and that it is not wrinkled or
too thick.
•
Load paper with the print side facing down. For example, if you are loading
glossy photo paper, load the paper with the glossy side down.
•
Make sure the paper lays flat in the input tray and is not wrinkled. If the
paper is too close to the printhead during printing, the ink might be
smeared. This can happen if the paper is raised, wrinkled, or very thick,
such as a mailing envelope.
For more information, see:
Load media
Cause: The paper was loaded incorrectly, or it was wrinkled or too thick.
If this did not solve the issue, try the next solution.
Solution 4: Check the paper type
Solution: HP recommends that you use HP papers or any other paper type
with ColorLok technology that is appropriate for the printer. All papers with the
ColorLok logo are independently tested to meet high standards of reliability and
print quality, and produce documents with crisp, vivid color, bolder blacks and dry
faster than ordinary plain papers.
Always make sure the paper you are printing on is flat. For best results when
printing images, use HP Advanced Photo Paper.
Store specialty media in its original packaging inside a resealable plastic bag on a
flat surface in a cool, dry place. When you are ready to print, remove only the
Chapter 8
86
Solve a problem

paper you plan to use immediately. When you have finished printing, return any
unused photo paper to the plastic bag. This prevents the photo paper from
curling.
NOTE: For this issue, there is not a problem with your ink supplies.
Therefore, replacing the ink cartridges is not necessary.
For more information, see:
Select print media
Cause: The wrong kind of paper was loaded in the input tray.
If this did not solve the issue, try the next solution.
Solution 5: Check the print settings
Solution: Check the print settings.
•
Check the print settings to see if the color settings are incorrect.
For example, check to see if the document is set to print in grayscale. Or,
check to see if advanced color settings such as saturation, brightness, or
color tone, are set to modify the appearance of colors.
•
Check the print quality setting and make sure it matches the type of paper
loaded in the printer.
You might need to choose a lower print quality setting if colors are running
into each other. Or, choose a higher setting if you are printing a high-quality
photo, and then make sure photo paper such as HP Advanced Photo Paper
is loaded in the input tray.
NOTE: On some computer screens, colors might appear differently than they
do when printed on paper. In this case, there is nothing wrong with the printer,
print settings, or ink cartridges. No further troubleshooting is required.
For more information, see:
Select print media
Cause: The print settings were set incorrectly.
If this did not solve the issue, try the next solution.
Solution 6: Print and evaluate a print quality report
Solution:
To print a print quality report
•
Control panel: Touch (right arrow), touch Setup, touch Reports, and
then touch Print Quality Report.
•
Embedded web server: Click the Tools tab, click Print Quality Toolbox
under Utilities, and then click the Print Quality Report button.
•
HP Utility (Mac OS X): In the Information And Support section, click
Print Quality Diagnostics, and then click Print.
Print quality troubleshooting
87
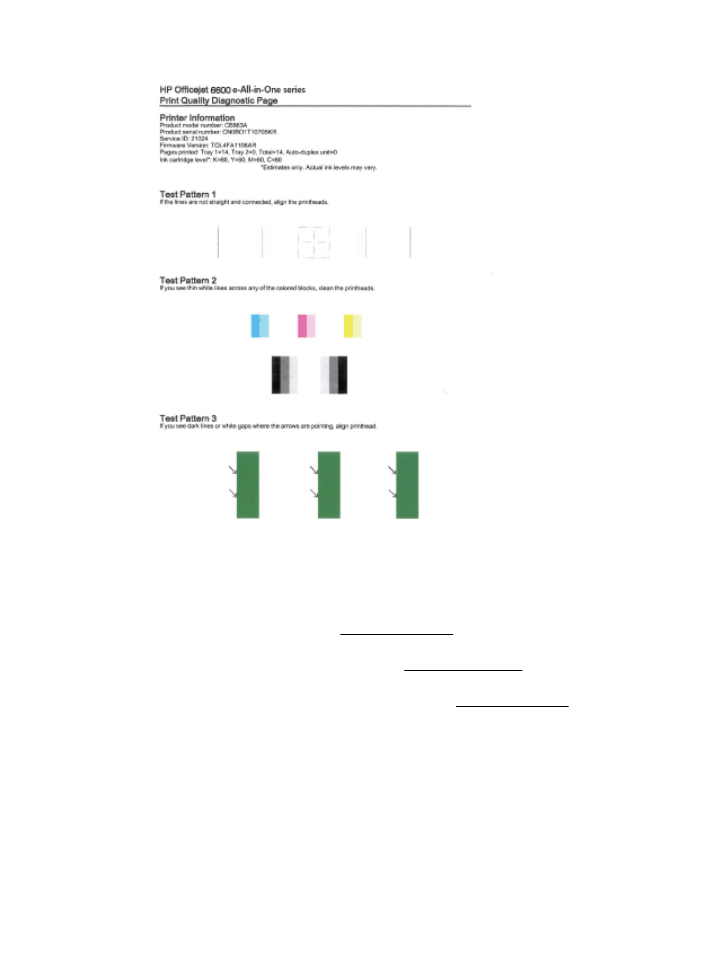
If defects are seen on the Print Quality Diagnostic report, follow the steps below:
1.
If the lines in Test Pattern 1 are not straight and connected, align the printer.
For more information, see Align the printhead.
2.
If you see white lines in any of the color blocks in Test Pattern 2, clean the
printhead. For more information, see Clean the printhead.
3.
If you see white or dark lines where the arrows are pointing in Test Pattern
3, align the printer. For more information, see Align the printhead.
Cause: Print quality problems can have many causes: software settings, a poor
image file, or the printing system itself. If you are unhappy with the quality of your
prints, a Print Quality Diagnostic page can help you determine if the printing
system is working correctly.
Solution 7: Contact HP support
Solution: Contact HP support for service.
If prompted, choose your country/region, and then click Contact HP for
information on calling for technical support.
Chapter 8
88
Solve a problem
TIP: If you are using a computer running Windows, you can visit the
HP online support website at www.hp.com/go/customercare. This website
provides information and utilities that can help you correct many common
printer problems.
Cause: There was a problem with the printhead.
Printhead maintenance
If you are experiencing problems with printing, you might have a problem with the
printhead. You should perform the procedures in the following sections only when
directed to do so for resolving print quality issues.
Performing the aligning and cleaning procedures unnecessarily can waste ink and
shorten the life of the cartridges.
This section contains the following topics:
•
Clean the printhead
•
Align the printhead
Clean the printhead
If your printed output is streaked or has any incorrect or missing colors, the printhead
might need to be cleaned.
There are two stages of cleaning. Each stage lasts about two minutes, uses one sheet
of paper, and uses an increasing amount of ink. After each stage, review the quality of
the printed page. You should only initiate the next phase of cleaning if the print quality
is poor.
If print quality still seems poor after you complete both stages of cleaning, try aligning
the printer. If print quality problems persist after cleaning and aligning, contact HP
support. For more information, see HP support.
NOTE: Cleaning uses ink, so clean the printhead only when necessary. The
cleaning process takes a few minutes. Some noise might be generated in the
process. Before cleaning the printhead, make sure you load paper. For more
information, see Load media.
Not turning the printer off correctly can cause print quality problems. For more
information, see Turn off the printer.
To clean the printhead from the control panel
1.
Load Letter, A4, or Legal unused plain white paper into the main input tray. For
more information, see Load standard-size media.
2.
Touch (right arrow), and then touch Setup.
3.
Touch Tools, and then touch Clean Printhead.
To clean the printhead from Toolbox (Windows)
1.
Load Letter, A4, or Legal unused plain white paper into the main input tray. For
more information, see Load standard-size media.
2.
Open Toolbox. For more information, see Open the Toolbox.
Print quality troubleshooting
89
3.
From the Device Services tab, click the icon to the left of Clean Printheads.
4.
Follow the onscreen instructions.
To clean the printhead from HP Utility (Mac OS X)
1.
Load Letter, A4, or Legal unused plain white paper into the main input tray. For
more information, see Load standard-size media.
2.
Open HP Utility. For more information, see HP Utility (Mac OS X).
3.
In the Information And Support section, click Clean Printheads.
4.
Click Clean, and then follow the onscreen instructions.
To clean the printhead from the embedded web server (EWS)
1.
Load Letter, A4, or Legal unused plain white paper into the main input tray. For
more information, see Load standard-size media.
2.
Open the EWS. For more information, see To open the embedded web server.
3.
Click the Tools tab, and then click Print Quality Toolbox in the Utilities section.
4.
Click Clean Printhead and follow the onscreen instructions.
Align the printhead
The printer automatically aligns the printhead during the initial setup.
You might want to use this feature when the printer status page shows streaking or
white lines through any of the blocks of color or if you are having print quality issues
with your printouts.
To align the printhead from the control panel
1.
Load Letter, A4, or Legal unused plain white paper into the main input tray. For
more information, see Load standard-size media.
2.
On the printer control panel, touch (right arrow), and then touch Setup.
3.
Touch Tools, and then select Align Printer.
To align the printhead from Toolbox (Windows)
1.
Load Letter, A4, or Legal unused plain white paper into the main input tray. For
more information, see Load standard-size media.
2.
Open Toolbox. For more information, see Open the Toolbox.
3.
From the Device Services tab, click the icon to the left of Align Printheads.
4.
Follow the onscreen instructions.
To align the printhead from HP Utility (Mac OS X)
1.
Load Letter, A4, or Legal unused plain white paper into the main input tray. For
more information, see Load standard-size media.
2.
Open HP Utility. For more information, see HP Utility (Mac OS X).
3.
In the Information And Support section, click Align Printhead.
4.
Click Align, and then follow the onscreen instructions.
Chapter 8
90
Solve a problem
To align the printhead from the embedded web server (EWS)
1.
Load Letter, A4, or Legal unused plain white paper into the main input tray. For
more information, see Load standard-size media.
2.
Open the EWS. For more information, see To open the embedded web server.
3.
Click the Tools tab, and then click Print Quality Toolbox in the Utilities section.
4.
Click Align Printhead and follow the onscreen instructions.